Why do you need to Export your Tally data?
You can export your data from one place to another due to the following reasons:
Export Masters – One can export the existing masters to another new company with duplicate data.Export Transactions – To use the already existing masters in a new company setup and share the same old data with your customers. For example, you can save paper and not share soft copies by exporting the transactions and communicating with customers or concerned persons.Export Reports – It can be used for reporting, as per your business needs.Configure Export – You can use the same customised configure settings for masters/transactions/reports and maintain export across the product.
However, while you are exporting data of your company in TallyPrime into another company, ensure the following points:
The Company features of the exporting and importing company must have the same settings preferably.The company should be Using the XML format, export the masters first, and then export the transactions.
Export Tally Data Masters and Transactions
A user can export tally data masters and transactions created in one company to another in different formats. To do so, follow the steps mentioned below:
First, Press Ctrl+E (Export) > Go to Masters/Transactions.Press C (Configure), and after opening configures screen, choose the options as needed.
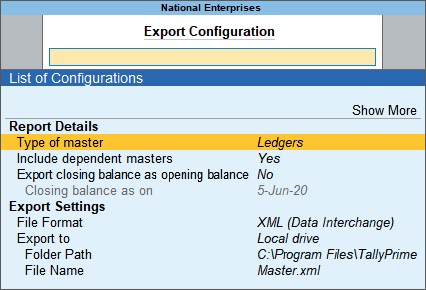
To export Masters, set the options.
Now, as you want to export tally data masters, Select the Type of Masters you wish to export.Either select a specific type of master (for example, ledger) or all the accounting/inventory masters. However, you can also choose ALL Masters, If you want to export all the data available in the masters.To include the linked masters, go to Type of Masters >select export> set the option “Include dependent masters” to Yes.To turn the closing balances of ledgers to opening balances, set “Export closing balance as opening balance” to Yes.
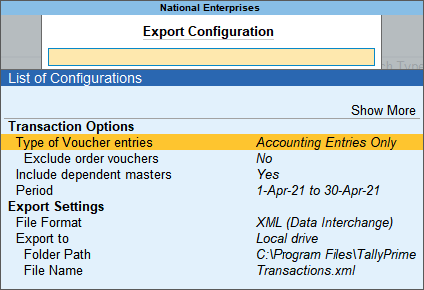
To export the transactions from one place to another, do the requirements in the options.
Select the Type of Voucher entries you want for export.Either select accounting vouchers or all the vouchers.To include all the masters, link to a particular master> go to “Type of Voucher entries” >select export, set the option “Include dependent masters” to Yes.To export the order vouchers with the selected voucher, set “Exclude order vouchers” to No.Select the period of exporting the vouchers.
Specify the Export Settings for masters and transactions.
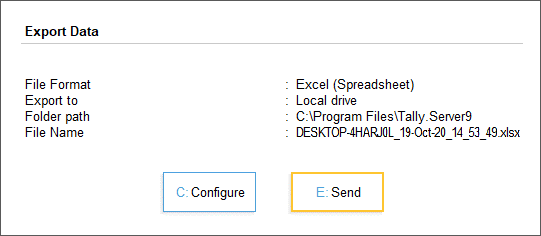
Now you need to select the File Format you want to export to:Select XML format if you’re going to import this data into another company or any other software.Select ASCII format if you want to export it as a comma-separated text file while sending data through e-mail.Select the Folder Path. The FileName appears automatically. Or change it if needed.Press Esc to return to the Export screen.Press E (Send) to export.
The exported file will be saved in the Folder Path selected while exporting the data.
Export Tally Data Vouchers in PDF format
Now you can also export Tally data by selecting the file format as PDF.
Export Tally Data from TallyPrime Server into Excel
Users can now easily export Tally data from the Tally Prime Server Monitor into MS Excel sheet format in raw data. They can even use this data to create reports using the Pivot Table tool feature in MS Excel.
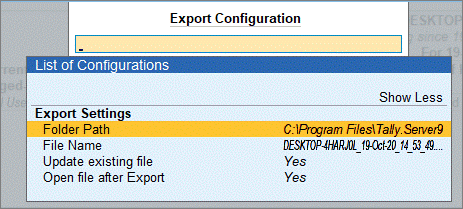
Press Alt+E (Export) > Choose Reports > Open Data for Analysis.Then, Press C (Configure), and if you want, you can change the export settings.Select Folder Path: You now can Enter the location where you want to export your Excel file.File Name: Enter the name that you want to provide to the exported Excel file. By default, the name will be
Note: The Date and time are provided in the DD-MMM-YY and HH-MM-SS 24-hour formats, respectively. So be careful while entering the data.
If you want to overwrite the previously exported file, click on Update the existing file to Yes.However, if you’re going to open the file as soon as it is exported, click on Open the file after Export to Yes,After doing all the necessary changes, Press Ctrl+A to accept the changes.Press E (Send) to export the data.
Recommended Articles
How to create Group in TallyCA Final ResultCA Intermediate ResultCA Foundation ResultAlter Ledgers in TallyOpening Balance in Tally


